CineStill 800T Fujifilm Recipe for Authentic Night Streets
Master the CineStill 800T Fujifilm recipe with our CineStill Fuji recipe settings, Fujifilm night recipe tables, and 800T film look halation tips today
Few film looks capture the atmosphere of night photography quite like CineStill 800T. Its tungsten-balanced colour, glowing highlights, and distinctive red-orange halation make it a favourite for neon streets, late-night diners, and rainy city scenes. However, if you want to recreate that look with a CineStill 800T Fujifilm recipe, you’ll need more than just choosing a cool white balance.
You need the right film simulation, Kelvin settings, grain, and exposure to get the balance between cool shadows and warm artificial lights. This guide explores five Fujifilm night recipes, practical mist-filter combinations, and camera settings for creating your own cinematic night photographs straight out of camera
Why Does the CineStill 800T Film Look Define Night Photography?
Photographers chase the 800T film look because standard daylight settings turn artificial city lights into muddy orange soup. True motion-picture tungsten stock is chemically balanced for 3200K studio lamps rather than 5500K midday sunlight.
Here are the four optical and chemical traits that give a CineStill 800T Fujifilm recipe its signature mood:
- Tungsten 3200K color balance neutralizes warm indoor bulbs while shifting mixed streetlamp shadows toward cinematic cyan-teal and steel blue.
- Removed remjet backing layers allow bright point light sources to bounce off the film base as red-orange halation.
- High-speed ISO 800 sensitivity thrives in dim subway stations, neon alleys, convenience stores, and wet urban crosswalks.
- Compressed motion-picture highlight latitude keeps glowing shop signs readable while holding atmospheric detail inside dark architectural corners.
- Fine cinema emulsion grain adds organic texture across misty night air without destroying skin tones under window light.
Read our 8 Must-Try Fujifilm Night Photography Recipes guide to explore broader evening looks beyond tungsten cinema stock.
Core Menu Settings for a True CineStill Fuji Recipe System
Dialing in a convincing CineStill Fuji recipe starts with selecting which base simulation matches your local street lighting. Different neighborhoods use warm sodium-vapor lamps, cool LEDs, or fluorescent tubes that react differently to Fujifilm film simulations.
Here is how each core camera parameter shapes your tungsten 800T film look straight out of camera:
- Base Film Simulation Choice sets the foundational contrast and color separation before any white balance shift takes effect.
- PRO Neg. Hi and Eterna deliver smooth motion-picture highlight roll-off and cool cyan-blue shadows under harsh stage or street lights.
- Classic Chrome and Classic Negative add punchier street contrast and stronger teal-versus-red separation around wet neon reflections.
- Custom Kelvin White Balance (2650K to 3200K) performs the heavy lifting required for an authentic tungsten cinema palette.
- Pairing 2650K with R -1, B +4 or 3000K with R -2, B +4 locks in cool teal-blue shadows.
- Dynamic Range DR400 at ISO 640+ gives your sensor two extra stops of headroom against blown neon tubes.
- Combining Highlight -1 or +1 with Shadow +1 keeps bright marquee lettering crisp while anchoring deep black alleys.
Check our Fujifilm White Balance Shift Explained guide to see how Red and Blue grid coordinates steer Kelvin warmth.
Five Fujifilm Night Recipes for Tungsten and Neon Looks
Not every night photograph needs the same colour treatment. Some scenes look better with cool cyan-blue shadows, while others benefit from warm amber streetlights and softer skin tones. These five Fujifilm recipes offer different approaches to tungsten lighting, night portraits, and cinematic street photography. Check their sensor compatibility before saving them to your custom slots.
1. Night Studio Tone: For Cool Tungsten and Neon Lighting

Night Studio Tone is built around PRO Neg. Hi and a 2650K white balance to create a cool tungsten-inspired appearance. Its R-1 / B+4 shift pushes the colour towards blue, while DR400 and zero Clarity make it a useful option for fast-moving night scenes.
Base simulation: PRO Neg. Hi
Compatible sensors: X-Trans IV, X-Trans V and GFX.
Key settings:
- Dynamic Range: DR400
- Highlight: +1 | Shadow: 0
- Color: +2 | Sharpness: +1
- Clarity: 0 | Noise Reduction: -4
- White Balance: 2650K
- WB Shift: R -1 / B +4
- Grain: Weak
- Color Chrome Effect: Strong
Best for: Neon streets, concert stages, night markets, and artificial tungsten lighting.
Explore the Night Studio Tone recipe.
2. Vintage Lamplight Tone: For Warm Streetlights and Rainy Streets

Not every cinematic night photograph needs icy-blue shadows. Vintage Lamplight Tone uses Classic Negative with a warmer Red shift to give artificial lighting a more nostalgic character. Its DR400 setting, softened contrast, and strong Color Chrome FX make it another option for atmospheric street photography.
Base simulation: Classic Negative
Compatible sensors: X-Trans IV, X-Trans V and GFX.
Recipe characteristics:
- White balance: Daylight with warm Red shift.
- Dynamic range: DR400 highlight protection.
- Shadows: Gentle tonal treatment.
- Colour: Muted palette.
- Contrast: Softened rendering.
- Color Chrome FX: Strong.
Best for: Warm streetlights, illuminated buildings, and nostalgic night scenes.
Explore the Vintage Lamplight Tone recipe.
3. Midnight Filament: For Warm Neon and Mixed Lighting

Midnight Filament uses Nostalgic Negative to create a warmer interpretation of night photography. Its tungsten-amber balance and restrained highlights work with the film simulation’s rich colour character. Stronger attention to grain and high-ISO noise settings gives it a different approach from the cooler Night Studio Tone.
Base simulation: Nostalgic Negative
Compatible sensors: X-Trans V and GFX.
Recipe characteristics:
- White balance: Warm tungsten-amber balance.
- Highlights: Restrained rendering.
- Shadows: Softened tonal curve.
- Colour: Rich, vibrant hues.
- High ISO Noise Reduction: Negative setting.
- Grain: Fine texture.
- Color Chrome: Added colour depth.
Best for: Mixed lighting, warm storefronts, neon signs, and evening street photography.
Explore the Midnight Filament recipe.
4. Warm Night: For Amber Neon and Cinematic Street Colours
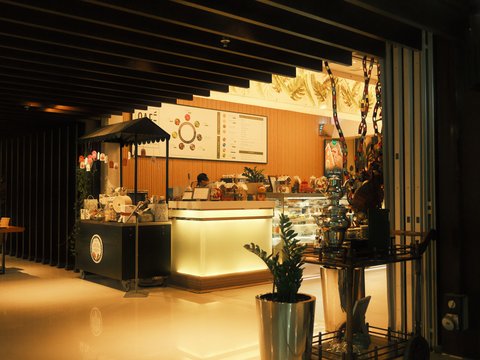
Warm Night takes Classic Negative in a more saturated direction. Its Auto White Balance setting with R+4 / B-5 creates a strong warm-cool colour separation, while DR400 and negative Clarity soften the appearance of bright artificial lights. It’s a good choice when you prefer warmer neon reflections over a cooler tungsten palette.
Base simulation: Classic Negative
Compatible sensors: X-Trans IV, X-Trans V and GFX.
Key settings:
- Dynamic Range: DR400
- Highlight: -1.5 | Shadow: +1
- Color: +4 | Sharpness: -2
- Clarity: -3 | Noise Reduction: -4
- White Balance: Auto
- WB Shift: R +4 / B -5
- Grain: Weak Small
- Color Chrome FX: Strong
- Color Chrome FX Blue: Weak
Best for: Neon signs, night markets, warm streetlights, and wet pavement reflections.
Explore the Warm Night recipe.
5. Night Reversal: For Vivid Landscapes and Colourful Night Scenes
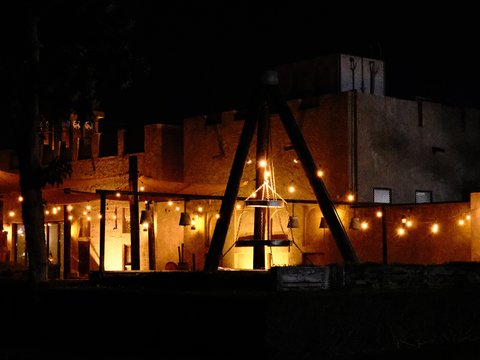
Night Reversal uses Velvia to bring rich colours, stronger contrast, and noticeable grain to your photographs. Its strong Color Chrome effects deepen blues and greens, making it suitable for colourful outdoor scenes, illuminated buildings, and golden-hour landscapes.
Base simulation: Velvia
Compatible sensors: X-Trans IV, X-Trans V and GFX.
Key settings:
- Dynamic Range: DR400
- Highlight: +1 | Shadow: +1
- Color: +2 | Sharpness: +1
- Clarity: +1 | Noise Reduction: -2
- White Balance: Auto
- WB Shift: R +2 / B -2
- Grain: Strong Small
- Color Chrome FX: Strong
- Color Chrome FX Blue: Strong
Best for: Vibrant landscapes, illuminated architecture, colourful city scenes, and golden-hour photography.
Shooting note: Start with exposure compensation between +1/3 and +1. Its strong saturation can overpower skin tones and subtle scenes, so use it when you want colours to stand out.
Explore the Night Reversal
Explore all ninety-one verified film looks and filter by night mood on our Fujifilm Recipes page today.
Comparing Classic Chrome 800T vs Eterna 800T Recipe Setups
Dedicated fans of the CineStill 800T Fujifilm recipe usually split into two camps: Classic Chrome versus Eterna Cinema. Classic Chrome delivers gritty documentary contrast, Eterna mimics the flat log-like latitude of Kodak Vision3 500T motion picture.
Here is the side-by-side parameter recipe card comparing Classic Chrome 800T against Eterna 800T across sensors:
| Menu Parameter | Classic Chrome 800T (Gritty Street) | Eterna 800T (Motion Picture Cinema) | Night Studio Tone (PRO Neg. Hi 2650K) | X-Trans V Porting Adjustment |
| Film Simulation | Classic Chrome | Eterna / Cinema | PRO Neg. Hi | Identical simulation selection |
| Dynamic Range | DR400 (requires min ISO 640) | DR400 (requires min ISO 640) | DR400 (requires min ISO 640) | Use DR400 to protect bright neon signs |
| White Balance & Shift | Kelvin 3000K (R -2 / B +4) | Kelvin 2850K (R -1 / B +3) | Kelvin 2650K (R -1 / B +4) | Keep Kelvin identical across sensors |
| Highlight & Shadow | Highlight -1, Shadow +1.5 | Highlight -1.5, Shadow +0.5 | Highlight +1, Shadow 0 | Half-steps supported on X-Pro3 and newer |
| Color & Sharpness | Color +2, Sharpness -1 | Color +3, Sharpness -2 | Color +2, Sharpness +1 | Boost Eterna Color to +3 for neon saturation |
| Clarity & High ISO NR | Clarity -3, High ISO NR -4 | Clarity -2, High ISO NR -4 | Clarity 0, High ISO NR -4 | Set Clarity 0 if you need fast burst shooting |
| Grain & Chrome FX | Weak Small, FX Strong, Blue Strong | Weak Small, FX Strong, Blue Weak | Weak Grain, FX Strong | Drop FX Blue one step on X-Trans V bodies |
Read our Fujifilm DR400 vs DR200 comparison guide to understand why DR400 is essential for bright night signage.
How to Recreate Signature 800T Halation Using Mist Filters?
No digital menu setting can physically bounce light off a film backing layer to create red-orange halation rings. To complete your 800T film look in camera, pair your CineStill Fuji recipe with an optical diffusion filter.
Here are the four optical filter and menu combinations that replicate remjet-free halation bloom at night:
- 1/4 and 1/8 Black Mist or CineBloom Glass
Threading a 1/8 or 1/4 Black Pro-Mist or Moment CineBloom filter onto your lens scatters bright point highlights. When red traffic lights or neon tubes hit that diffusion glass, a soft halo blooms around every bulb. Use 1/8 strength on 35mm or 50mm primes for subtle glow, or 1/4 strength on 23mm street lenses.
- Balancing Negative Clarity With Optical Mist
If you already shoot with a physical 1/4 diffusion filter on your lens, avoid setting Clarity to minus four. Stacking heavy optical mist on top of extreme negative Clarity can make night portraits look overly mushy. Instead, keep Clarity at zero or minus one with a filter, or use Clarity minus three on bare glass.
- Metering for Neon Highlights to Control Bloom
Halation looks most convincing when the core of a neon tube stays detailed rather than clipping to pure white. Dial your exposure compensation between minus one-third and minus one full stop when framing glowing gas station canopies. Let shadows fall naturally into dark teal-black while your mist filter wraps the warm light sources in bloom.
Combining controlled highlight exposure with tungsten white balance shifts keeps artificial street lamps rich and atmospheric.
Explore our Fujifilm Grain Effect settings guide to pair Weak Small grain with your optical mist filter.
Best Night Environments to Shoot Your CineStill 800T Setup
Even the best CineStill 800T Fujifilm recipe looks flat if you point your camera down an unlit residential street. Tungsten recipes come alive when scenes contain mixed color temperatures, reflective surfaces, and layered artificial illumination.
Here are the five best urban environments to test your Fujifilm night recipe after sunset:
- Gas stations and roadside convenience stores provide overhead fluorescent canopies that turn crisp white against deep cyan-blue night skies.
- Rain-slicked crosswalks and wet cobblestones double every neon sign and traffic tail light through shimmering ground reflections.
- Late-night diners and steamed window cafes create cinematic contrast between warm interior tungsten bulbs and cold exterior pavement.
- Subway platforms and train interiors bathe commuters in cool greenish-white tube lighting that suits Eterna and PRO Neg. Hi.
- Busy night markets and concert stages let Night Studio Tone separate warm vendor lamps from smoky blue background shadows.
Have a favorite night film frame? Upload it into our Fujifilm Recipe Finder to match its palette instantly.
Converting a CineStill 800T Fujifilm Recipe Across Sensors
A CineStill 800T Fujifilm recipe designed on an X100V or X-T4 will shift slightly cooler on an X100VI or X-T5. Checking Fujifilm sensor generations before saving your custom slot keeps cyan shadows from turning overly heavy.
Here is how to adapt your tungsten 800T settings across fifth-generation, fourth-generation, and older X-Trans bodies:
- Porting from X-Trans IV to X-Trans V (X100VI, X-T5, X-T50, X-E5) requires one small blue-channel adjustment.
- Drop Color Chrome FX Blue one step from Strong to Weak because fifth-generation processors render deeper blue-cyan shadows.
- Keep Grain Size on Small and Strength on Weak so forty-megapixel files stay smooth at ISO 3200.
- Adapting for Early X-Trans IV (X-T3, X-T30 Gen 1) and X-Trans III (X-T2, X-Pro2, X100F) is straightforward.
- Skip Clarity and Color Chrome FX Blue since those bodies use classic tone curves and Kelvin shifts alone.
- Dedicate your Custom Kelvin preset to your night slot because pre-2019 firmware shares one shift per WB mode.
Read our Fujifilm X100VI Recipes starter guide to see how forty-megapixel sensors handle high-ISO night settings.
Create Your Own Cinematic Fujifilm Night Look
A convincing CineStill 800T-inspired photograph comes from balancing cool tungsten colours, warm artificial lights, controlled highlights, and the right amount of diffusion. Start with a recipe that matches your camera and preferred night photography style, then experiment with Kelvin settings and mist filters to shape the final look. Explore more Fujifilm night photography recipes and find a setup worth taking on your next evening walk.
Turn ordinary night streets into cinematic frames. Find your next Fujifilm night recipe on FujiPic.
Frequently Asked Questions
1. What Is the Best CineStill 800T Fujifilm Recipe?
For cool cyan-teal tungsten nights with zero Clarity lag, load Night Studio Tone on PRO Neg. Hi at 2650K. If you want gritty street contrast around neon signs, pair Classic Chrome with 3000K Kelvin and R -2, B +4. For flatter motion-picture latitude in dim subways or diners, use Eterna Cinema at 2850K with Color set to plus three.
2. How Do I Get Red Halation on a Fujifilm Camera?
Real CineStill 800T halation comes from light bouncing inside the film base because the remjet layer was removed. Digital sensors cannot create red halation rings through menu settings alone, so attach a 1/8 or 1/4 Black Mist filter. Combine that optical diffusion filter with DR400 and slightly negative exposure compensation so bright red and amber lights bloom naturally.
3. What White Balance Gives the True 800T Look?
Real CineStill 800T is balanced for 3200K tungsten studio lamps, which makes mixed street lighting appear cool and cyan-blue. Set your Fujifilm White Balance to Custom Kelvin between 2650K and 3100K with a shift around R -1, B +4. You can preview how these Kelvin and R/B shifts interact using the interactive White Balance tool on FujiPic Tools.
4. Can I Shoot a CineStill 800T Recipe in Daylight?
If you shoot a 2650K or 3000K tungsten recipe under midday sun, your entire JPEG will look deeply blue. Analog photographers attach an orange 85B warming filter when shooting real 800T outdoors during the day. On a Fujifilm camera, simply switch your White Balance to Daylight or Auto while keeping the same tone curve.
5. What Auto-ISO Setting Works Best for 800T Night?
Program Auto-ISO 3 with a minimum sensitivity of ISO 640 or 800 so Dynamic Range DR400 stays permanently active. Set your maximum ISO ceiling to 6400 and your minimum shutter speed between 1/60s and 1/125s for street walkers. Keep High ISO Noise Reduction at minus four so high-ISO files retain crisp filmic grain instead of waxy skin.
6. Does Clarity Slow Down Night Street Shooting?
Yes, setting Clarity to any non-zero value, such as minus three in Warm Night, triggers a one-second processing pause per frame. If you shoot deliberate tripod scenes or slow neon reflections, that brief pause is well worth the dreamy midtone glow. If you need fast continuous bursts for street candid moments, use Night Studio Tone which keeps Clarity at zero.
7. Can Older X-Trans III Cameras Shoot 800T Looks?
Yes, X-Trans III cameras like the X-T2, X-Pro2, and X100F have Custom Kelvin, Classic Chrome, and PRO Neg. Hi. Simply enter 2650K or 3000K with R -1, B +4, set DR400 at ISO 640, and turn Grain to Weak. Skip the newer Clarity and Color Chrome lines, and your older body will still produce authentic tungsten night JPEGs.
8. Should I Shoot RAW+JPEG With Night Recipes?
Enabling Fine+RAW is smart when testing a new Fujifilm night recipe under tricky sodium-vapor or LED street lamps. Your camera saves the finished tungsten JPEG while keeping the untouched RAW file on your card as insurance. You can re-render that RAW file in camera later via RAW Conversion if you want to test different Kelvin values.