Must-Try Fujifilm X-T5 Recipes for Film-Style JPEGs
Try these Fujifilm X-T5 recipes for film-style JPEGs, with practical settings for color, grain, white balance, contrast, everyday shooting and travel too.
Fujifilm X-T5 recipes are saved JPEG settings that shape colour, contrast, grain, and other in-camera rendering choices. Fuji X Weekly identifies the X-T5 as a fifth-generation X-Trans V camera.
X-T5 Recipe Quick Take
| What it does: Gives your JPEGs a repeatable look straight from the camera. What to check: Use recipes made for X-Trans V. What stays untouched: Your RAW file. |
Maybe you keep shooting RAW because the default JPEG feels flat, or because you know you’ll end up fixing the photo later anyway. After a trip, those little edits across hundreds of files can eat up an entire evening.
That’s where Fujifilm X-T5 recipes become useful. This guide covers must try X-T5 film recipes, shows you how to save them as Custom Settings, and explains which X-T5 settings to tweak when the light changes.
Shooting with an X-T5? Get to know your camera a little better on FujiPic before trying out a new look.
Why X-Trans V Changes the Look?
The X-T5 uses X-Trans V, and some film simulations render differently on this generation, particularly in deep blue areas.
That means an older recipe can still work, but copying every setting does not guarantee the same JPEG rendering.
- Blue rendering: Fuji X Weekly reports deeper blue rendering on X-Trans V with Classic Chrome, Classic Negative, Eterna, and Eterna Bleach Bypass.
- Fifth-generation cameras: As of the source’s writing, Fuji X Weekly lists X-H2, X-H2S, X-T5, X-S20, X100VI, X-T50, X-M5, X-E5, and X-T30 III in its fifth-generation group.
- Color Chrome FX Blue: For those four affected simulations, Fuji X Weekly recommends reducing Color Chrome FX Blue by one step when adapting an X-Trans IV recipe to X-Trans V
| X-T5 Recipe Check | What It Means | What You Should Do |
| Does X-Trans V change Fujifilm recipes? | Sometimes. An X-Trans IV recipe can render differently on the X-T5, particularly with some film simulations and blue tones. | Prefer an X-Trans V recipe when available. |
| Using an X-Trans IV recipe | The settings may transfer, but the JPEG rendering is not guaranteed to match exactly. | Check the Film Simulation and Color Chrome FX Blue, then shoot a few comparison frames. |
| Need to convert a recipe? | Fujipic’s Recipe Converter translates supported recipes between X-Trans IV and X-Trans V. | Use the Recipe Converter, then fine-tune the converted result if needed. |
| Why does this happen? | FujiPic says recipe compatibility depends on the sensor and processor pairing, rather than the lens or autofocus system. | Match the recipe to your camera’s sensor family before loading it. Check Fujipic’s camera guide. |
Which Recipes Match Your Sensor And Which Need Converting?
A recipe tagged x-trans-v matches the X-T5’s X-Trans V sensor family, while x-trans-iv recipes may need converting first.
Use the sensor tag as your first check, then decide whether to load directly or run the recipe through the converter.
| Recipe sensor tag | Loads directly on X-T5? | What to do |
| x-trans-v | Yes, intended match | Load it directly and enter the listed settings. |
| x-trans-iv | May differ | Convert it before use, then compare the result on your X-T5. |
| No tag shown | VERIFY | Check the recipe source, Film Simulation, and available camera controls before loading. |
Recipe Compatibility At a Glance
| Check | What it means for your X-T5 |
| Sensor tag | x-trans-v is the direct match. x-trans-iv recipes can render differently on X-Trans V. |
| Older recipe | Do not assume identical JPEG output just because every setting value matches. |
| X-Trans IV reference | Use the X-Trans IV recipe collection when checking older recipes before converting them. |
| No sensor tag | VERIFY compatibility before copying the settings. |
| Recipe Converter | What it does |
| Tool | The Recipe Converter translates recipes between X-Trans IV and X-Trans V. |
| Color Chrome FX Blue | Handles Color Chrome FX Blue automatically during the conversion. |
| When to use it | Use it when you want to adapt an x-trans-iv recipe for an X-T5. |
| What it cannot promise | Conversion can reduce generation differences, but the finished JPEG may still not look identical. |
| Final check | Shoot a test frame with your converted recipe and compare colour, contrast, and blue rendering before a full shoot. |
For Fujifilm recipe compatibility, the safest workflow is to match the sensor tag first, convert when needed, then judge the JPEG on your own X-T5 photos.
Browse X-T5-compatible recipes before choosing your next setup.
How to Save X-T5 Recipes in C1 to C7?
The Fujifilm X-T5 has seven Custom Setting banks, C1 through C7, for saving different JPEG setups.
- Open MENU/OK → Image Quality Setting → Edit/Save Custom Setting.
- To create a new setup, select an available Create New C1–C7 bank and confirm.
- Enter the recipe’s Film Simulation, Dynamic Range, Highlight, Shadow, Color, white balance, grain and other listed values.
- Confirm the save, then reopen the custom setting and compare the values with the original recipe.
When editing an existing bank, select it and choose Edit/Check. If automatic updates are disabled, make sure you explicitly save your changes.
Before shooting, double-check White Balance and WB Shift, because even a small difference can change the finished JPEG.
Want to get more out of your X-T5? Discover what makes this camera special and find inspiration for your next shoot.
Everyday X-T5 Recipes for Street and Travel
Classic Chrome is the shared starting point for these everyday X-T5 street photography settings and travel recipes.
The notes below follow each recipe page, not firsthand testing, so treat them as published starting points.
| Recipe | Film simulation | Best for |
| Summer ’89 | Classic Chrome | Golden-hour street scenes, travel moments, urban photography |
| Old Classic Color | Classic Chrome | Golden-hour street and travel shots, daily-life scenes |
| Kodak Softlight | Classic Chrome | Street, travel, daily life, natural-light scenes |
- Summer ’89
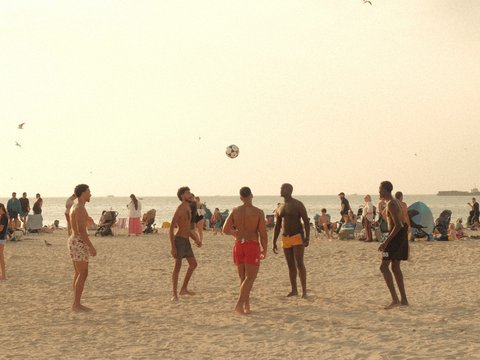
- Look: Warm, earthy tones, reduced contrast, cooler WB shift, and strong small grain give outdoor scenes a nostalgic film character.
- Where it fails: Studio portraits and high-ISO scenes can expose the recipe’s limitations, particularly through visible grain or cooler skin rendering.
- First adjustment: Check the WB Shift first when skin tones start looking too cool.
- Old Classic Color
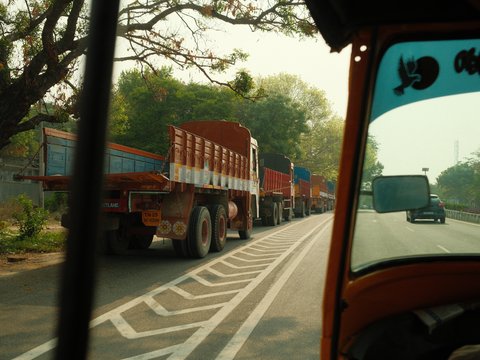
- Look: Muted highlights and shadows combine with a cool blue WB shift, strong Color Chrome, and strong small grain for a nostalgic travel look.
- Where it fails: It is less suited to studio portraits, can show stronger grain at high ISO, and may need exposure adjustments.
- First adjustment: Check Exposure Compensation when the scene looks noticeably brighter or darker than expected.
- Kodak Softlight

- Look: Warm colour, lush greens and browns, softened highlights, gentle shadows, and subtle grain suit everyday outdoor photography.
- Where it fails: Warm indoor light can push the colour cast further, while high ISO may reduce perceived sharpness.
- First adjustment: Check the WB Shift when indoor lighting makes the warmth feel excessive.
For a broader set of travel recipes and guidance on adapting recipes while moving between different lighting conditions, see 10 Best Fujifilm Travel Recipes for Everyday Shooting.
Classic Negative and Reala Ace Recipes on the X-T5
Classic Negative and Reala Ace are both available on the X-T5, with the recipes below giving you different ways to control colour and tone.
The sensor tag also matters, so check each recipe before copying its settings into your Custom Setting slots.
- Late Night Print
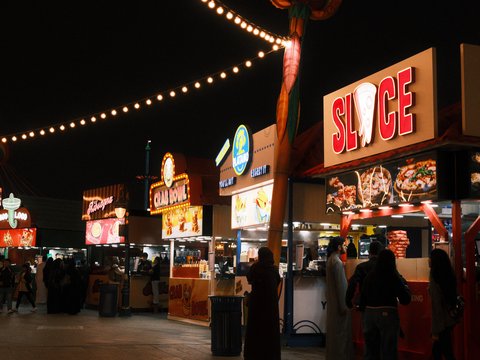
Film Simulation: Classic Negative
Sensor: x-trans-v
X-T5 fit: Listed specifically for the X-T5.
Look: Warm, rich colour with gentle highlights and warm shadows suits lively urban scenes.
Best conditions: Mixed lighting, overcast streets, and golden hour.
Watch for: Strong grain at high ISO and a cool WB shift that can affect blues.
- Expired Reala Warmth
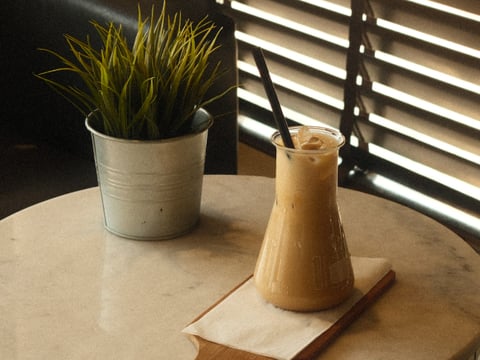
Film Simulation: Reala Ace
Sensor: x-trans-v
X-T5 fit: Listed specifically for the X-T5.
Tone: Dynamic Range DR400 · Highlight -1.5 · Shadow +1.5
Look: Faded colour, softened micro-contrast, and strong large grain create an aged-film character.
Best conditions: Portraits and everyday moments in soft or open light.
Watch for: High-contrast scenes and bright highlights can fight the recipe’s airy rendering.
- Old Sunday Roll
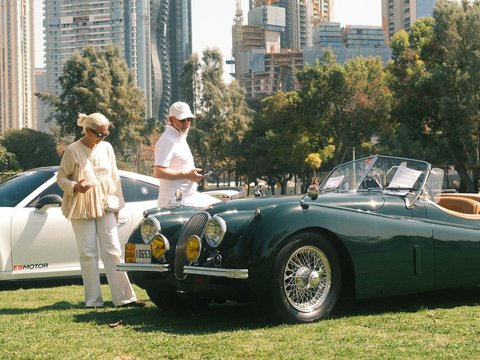
Film Simulation: Classic Negative
Sensor tag: VERIFY
X-T5 fit: The recipe page does not show a sensor tag, so verify before loading.
Look: Warm, nostalgic colour with muted highlights, reduced clarity, and strong small grain.
Best conditions: Overcast street scenes, mixed lighting, and colourful urban environments.
Watch for: Strong grain at high ISO and a blue shift that can affect skin tones.
Color Chrome FX Blue on the X-T5: The Setting That Changes Most
Color Chrome FX Blue has three settings, Off, Weak, and Strong, and it affects only blue areas of a scene.
Use this quick comparison to see what changes before choosing a setting for your recipe.
| Setting | Effect on blue areas | Two-minute test |
| Off | Leaves blue areas without the Color Chrome FX Blue effect. | Photograph the same blue sky and blue object. |
| Weak | Applies a weaker tonal effect to blue areas. | Repeat both shots without changing exposure or white balance. |
| Strong | Applies the strongest tonal effect to blue areas. | Shoot the same two scenes again and compare all three versions. |
What changes on X-Trans V
- Blue rendering: X-Trans V can render blue more deeply with Classic Chrome, Classic Negative, Eterna, and Eterna Bleach Bypass than X-Trans IV.
- Color Chrome FX Blue settings: The available choices remain Off, Weak, and Strong, with the effect limited to blue areas.
- No single setting: Your preferred value can depend on the Film Simulation, recipe, lighting, and how strong you want the blue rendering to appear.
Run the test
- Set Off: Photograph one blue sky and one blue object.
- Set Weak: Keep framing, exposure, Film Simulation, and white balance unchanged.
- Set Strong: Shoot the same sky and object again.
- Compare JPEGs: Put all six images side by side on the same screen.
- Choose your value: Keep the setting that gives you the blue rendering you actually prefer.
Switching sensor generations: Use the Recipe Converter when adapting supported X-Trans IV recipes to X-Trans V. The converter automatically handles the Color Chrome FX Blue adjustment for affected Film Simulations.
Grain and Noise Reduction on the X-T5
Grain Effect adds simulated film grain, while High ISO NR controls how much fine detail is smoothed at higher ISO settings.
For X-T5 grain settings, these three practical rules give you a sensible starting point without treating any value as universal.
- Weak + Small: A useful starting point when you want fine texture without overwhelming small details or subtle tonal transitions.
- Strong + Large: Use when you deliberately want obvious, visible texture and a more pronounced film-inspired rendering.
- Avoid Strong + Small: Pal2Tech’s X-T5 grain guidance warns that this combination can make the texture read more like digital noise than natural-looking grain.
High ISO NR: Lower High ISO NR values preserve more fine texture and visible noise, while higher values smooth more of the fine detail. The right balance depends on your subject, ISO, viewing distance, and whether the JPEG is mainly for a screen or a larger print.
Sharpening order: Photographers who have studied Fujifilm’s JPEG processing report that Grain Effect is applied before sharpening, which means the Sharpness setting can change how pronounced the grain appears.
For a deeper look at how grain size, roughness, ISO, and sharpening interact, see the Fujifilm Grain Effect Settings Guide.
Build Your Own X-T5 Look Instead of Copying Recipes
A custom recipe is built through repeated tests on your own scenes, not by getting one setting right on the first attempt.
Start with a familiar film simulation, shape the tones, test colour, then save what actually works for you.
- Pick a base Film Simulation: Start with the simulation closest to the look you want, such as Classic Chrome, Classic Negative, or Reala Ace.
- Adjust Dynamic Range and tone: Set Dynamic Range, then fine-tune Highlight and Shadow to control how the JPEG handles bright and dark areas.
- Test White Balance Shift: Photograph one consistent scene, adjust the R/B shift in small steps, and compare each JPEG before changing anything else.
- Save the recipe: Store the combination in a Custom Setting slot, then shoot it across several scenes before deciding what needs another round.
| Build stage | What to watch |
| Film Simulation | Sets the overall direction of the JPEG rendering. |
| Tone | Controls contrast before you fine-tune colour. |
| White Balance Shift | Change the colour balance for your lighting and subject. |
| Testing | Shows what works consistently beyond one scene. |
| Saving | Turn your preferred combination into a repeatable setup. |
Want a look that is yours instead of a copied recipe? The custom recipe guide walks through building one from scratch.
A first version is rarely final, so expect several test rounds before your custom Fujifilm recipe settles into something you trust.
For a specific film look, the Film Stock Matcher finds Fuji recipes that most closely match selected real film stocks.
End Notes
Your Fujifilm X-T5 recipes work best when you match the sensor, save settings correctly, and test key colour controls.
- Check the sensor tag: Start with x-trans-v recipes for the X-T5.
- Save to Custom Settings: Keep each recipe in C1 to C7 for quick recall.
- Test Color Chrome FX Blue: Compare Off, Weak, and Strong on the same scene.
Ready to give your X-T5 a signature look? Find a recipe that feels like your style and take it on your next photo walk.
Frequently Asked Questions
- What makes X-Trans V different for X-T5 recipes?
X-Trans V can render some Fujifilm film simulations with deeper blue than X-Trans IV, which can change how an older recipe looks on the X-T5. Fuji X Weekly reports this difference particularly with Classic Chrome, Classic Negative, Eterna, and Eterna Bleach Bypass, although the effect varies by Film Simulation and recipe.
- Do X-T4 recipes work on the X-T5?
X-T4 recipes can be adapted to the X-T5 because both support many of the same core image settings, but their JPEG rendering can differ across sensor generations. According to FujiPic’s Recipe Converter, supported X-Trans IV recipes may need a Color Chrome FX Blue adjustment when moved to X-Trans V, so check the converted JPEG before relying on it.
- Where are the X-T5 custom settings, and how many are there?
The X-T5 stores recipes in Custom Setting C1 through C7, giving you seven saved slots for different JPEG setups. According to Fujipic’s recipe library and Tools page, those slots store the recipe parameters, although the exact menu path should still be checked against the X-T5 manual.
- What is the best film simulation for street photography on the X-T5?
There is no single best Film Simulation for every street scene, but Classic Chrome is a strong starting point for muted street and travel rendering. Fujipic’s Film Simulation Picker lists Classic Chrome for street and travel, while lighting, subject colour, and your preferred contrast can make another simulation more suitable.
- Why does Color Chrome FX Blue matter on the X-T5?
Color Chrome FX Blue affects blue areas and offers OFF, WEAK, and STRONG, making it important when adapting recipes between sensor generations. Fujifilm’s Learning Centre confirms those three settings, while FujiPic’s converter notes that X-Trans V can render certain simulations with deeper blue, so the useful value depends on the Film Simulation and recipe.
- Does Classic Negative work well on the X-T5?
Classic Negative works on the X-T5 and is used in FujiPic recipes tagged x-trans-v, including Late Night Print. Fujipic describes Classic Negative as a warmer, cinematic option, but the final JPEG still depends on the recipe’s other settings and shooting conditions.
- Can I convert an X-Trans IV recipe to the X-T5?
You can convert a supported X-Trans IV recipe to the X-T5 using FujiPic’s Recipe Converter, which translates between X-Trans IV and X-Trans V and handles Color Chrome FX Blue automatically. The converted recipe is a starting point rather than a guaranteed identical rendering, so compare it with your own JPEGs.
- Do X-T5 recipes change video?
X-T5 recipes are primarily JPEG-rendering setups for still photography, and not every recipe setting applies to video. According to Fujipic, Grain Effect is stills-only, so any video workflow should be treated separately and VERIFY which other recipe parameters carry into your camera’s video mode.