Fujifilm X100V Recipes: 8 Film Simulation Settings for JPEGs
Get 8 ready-to-use film simulation settings for your X100V. Full recipes with grain, white balance and tone, so you get great JPEGs without editing.
Let’s be honest, nobody buys an X100V to spend Sunday night fixing hundreds of photos in Lightroom. Yet, plenty of photographers still shoot RAW because the default JPEG look doesn’t quite feel right straight out of camera.
That gets old quickly. After a weekend trip or a busy day on the street, you can easily come home with hundreds of shots, all needing small tweaks to highlights, shadows, white balance, and color. Do that for every image, every time, and the hours start adding up.
A few dependable Fujifilm X100V recipes can take much of that work out of the process. Instead of starting with a blank slate, you can save a look to your camera and make JPEGs that are ready to use as soon as you press the shutter.
In this guide, we’ve put together eight versatile X100V JPEG recipes for everyday shooting, portraits, low light, and more. You’ll also get the exact X100V settings, plus WB Shift and tone adjustments you can use when the light or subject changes.
What Are the Key Fujifilm X100V Specs?
The X100V combines a high-resolution APS-C sensor with a fixed lens and physical controls designed for direct operation. Here are the specifications that matter most when evaluating the camera.
| Specification | Fujifilm X100V |
| Sensor | 26.1MP APS-C X-Trans CMOS 4 |
| Image processor | X-Processor 4 |
| Lens | Fixed 23mm f/2 Fujinon lens |
| Full-frame-equivalent focal length | 35mm |
| Image stabilization | No in-body image stabilization |
| Viewfinder | Hybrid optical and electronic viewfinder |
| Electronic viewfinder | 3.69-million-dot OLED |
| Rear display | Three-inch tilting touchscreen |
| Film Simulations | 17, according to Fujifilm’s official product information |
| Built-in ND filter | Four stops |
| Video recording | Up to 4K/30p |
| Body design | Compact, fixed-lens camera |
| Release year | 2020 |
| Current product status | Discontinued |
Specifications are based on Fujifilm’s official X100V product information and its published feature details.
The sensor, lens and viewfinder define much of the shooting experience. The lack of image stabilization and interchangeable lenses also explains why the X100V is best suited to particular photography styles rather than every possible subject.
How Good Is the X100V’s 26.1MP Sensor?
The Fujifilm X100V pairs a 26.1MP X-Trans CMOS 4 sensor with the X-Processor 4, producing detailed images while supporting in-camera processing and autofocus.
What does 26.1MP mean in practice?
- Cropping flexibility: Reframe images or remove distractions after shooting.
- Print quality: Preserve detail across a range of print sizes.
- Overall image quality: Lighting, focus, exposure, lens performance and subject movement matter alongside resolution.
Why the lens matters
Fujifilm redesigned the fixed lens to improve resolution, reduce distortion and enhance close-focus performance without making the camera larger. This helps the lens resolve detail from the sensor.
The X100V suits photographers who want detailed images in a compact body, although the newer X100VI offers a higher 40.2MP resolution.
What Film Simulations Are Available on the X100V?
The X100V includes Fujifilm Film Simulations that change how the camera renders colour and tone in JPEG images. These modes let you choose a visual starting point in camera instead of relying entirely on editing software later.
Examples include:
| Film Simulation | Typical use |
| PROVIA/STANDARD | General-purpose photography |
| Velvia/VIVID | Landscapes and scenes where vivid colour is desirable |
| ASTIA/SOFT | Portraits and softer colour rendering |
| Classic Chrome | Documentary photography and muted colour |
| Classic Negative | Distinctive colour with stronger tonal contrast |
| ACROS | Black-and-white photography |
| ETERNA/CINEMA | Softer, cinematic colour rendering |
These are starting points rather than strict rules. Lighting, exposure, white balance and other image-quality settings influence the final result.
Shooting with the X100V? Find your next favourite setup on FujiPic and make the most of every shot.
What X100V Recipes Are and What They Change in JPGs?
A recipe combines a film simulation with several image-quality settings to give your X100V JPEGs a repeatable look straight from the camera. It is simply a saved shooting setup, so you can switch between looks without rebuilding every setting from scratch.
Here’s what those settings actually change in the JPEG your camera produces:
| Setting | What it changes |
| Film Simulation | Sets the base colour and tonal rendering of the JPEG. |
| Grain Effect | Adds film-style grain, with options for roughness and size. |
| Color Chrome Effect | Adds more tonal variation to highly saturated reds, yellows, and greens. |
| Color Chrome FX Blue | Adds more tonal variation to strongly saturated blue areas. |
| White Balance | Sets the overall colour temperature of the JPEG. |
| Dynamic Range | Helps retain highlight detail in high-contrast scenes. |
| Highlight | Adjusts highlight contrast; on the X100V, this is part of TONE CURVE. |
| Shadow | Adjusts shadow contrast; on the X100V, this is part of TONE CURVE. |
| Color | Raises or lowers colour density in the JPEG. |
| Sharpness | Makes edges appear sharper or softer. |
| High ISO NR | VERIFY: X100V menu label is NOISE REDUCTION; controls high-ISO noise processing. |
| Clarity | Increases definition while making smaller changes to highlights and shadows. |
| What you save | What happens |
| Recipe | A group of in-camera JPEG settings saved to a Custom Setting bank. |
| JPEG | The camera applies those settings when it renders the finished JPEG. |
| RAW | The original RAW file remains untouched by the recipe. |
| RAW + JPEG | You keep the recipe-based JPEG and the original RAW file together. |
So, when you save one of these X100V recipes, you are not saving an editing preset for Lightroom. You are saving the camera’s own JPEG recipe, ready to recall from a Custom Setting bank whenever you want that setup again.
The RAW file remains untouched because the recipe only changes how the camera processes the JPEG. You can browse the available Fujipic recipes and use them as starting points for your own Custom Settings.
X100V vs X100VI: Which Recipes Fit Your Camera
The X100V and X100VI belong to different sensor generations, so recipe compatibility depends on which body you actually own.
Here’s the simple breakdown before you copy any settings into your Custom Setting slots.
- If you own an X100V
Sensor: X-Trans IV
Best starting point: Recipes tagged X-Trans IV on Fujipic.
The X100V uses Fujifilm’s X-Trans CMOS 4 sensor and X-Processor 4, making X-Trans IV recipes the safest starting point for this camera.
Browse: X-Trans IV
- If you own an X100VI
Sensor: X-Trans V
Best starting point: Recipes tagged X-Trans V.
Fujifilm lists the X100VI with an X-Trans CMOS 5 HR sensor and X-Processor 5. Fuji X Weekly also classifies the X100VI among its fifth-generation X-Trans cameras.
Using an X-Trans V recipe on an X-Trans IV camera?
Use Fujipic’s Recipe Converter to handle the X-Trans IV → X-Trans V translation. Converted recipes can still show color differences compared with the original.
Check these 3 things first
| Check | What to look for |
| 1. Sensor tag | X-Trans IV for X100V, X-Trans V for X100VI. |
| 2. Film Simulation | Make sure the recipe’s Film Simulation is available on your camera. |
| 3. Color Chrome settings | Check Color Chrome Effect and Color Chrome FX Blue before loading the recipe. |
One thing to remember: compatibility does not mean identical rendering. Even when a recipe can be translated between generations, the final JPEG can still differ, particularly in how certain colours are rendered.
How to Load an X100V Recipe Into a Custom Setting
Load a recipe by opening the Custom Setting menu, entering each value, and saving the finished setup to a camera slot.
Keep the recipe beside your X100V and copy each setting exactly as shown.
- Open the Custom Setting Menu
MENU/OK → IMAGE QUALITY SETTING → EDIT/SAVE CUSTOM SETTING
- Choose a Custom Slot
VERIFY: Select an available CUSTOM 1–CUSTOM 7 (C1–C7) slot.
- Open the Setting Editor
VERIFY: Select EDIT. The X100V manual uses EDIT, not EDIT/CHECK.
- Enter the Recipe Values
Copy the settings one by one:
FILM SIMULATION → GRAIN EFFECT → WHITE BALANCE → DYNAMIC RANGE → TONE CURVE → remaining recipe settings
- Confirm Each Adjustment
Press MENU/OK after changing each value, then move to the next setting.
- Save the Recipe
DISP/BACK → OK → MENU/OK
Before You Shoot:
| Check | What to verify |
| Film Simulation | Matches the recipe |
| White Balance | Matches exactly |
| WB Shift | Check both R and B values |
| Dynamic Range | Matches the recipe |
| Tone Curve | Check Highlight and Shadow |
| Other settings | Compare every value with the original recipe |
One important check: White Balance Shift can save differently on some older Fujifilm bodies, so verify the displayed R/B values before shooting.
Everyday Starter Recipes for the X100V
For everyday X100V shooting, these four recipes cover street, travel, golden hour, and low-light scenes without constant editing.
I’ve picked recipes with FujiPic-tested X100V compatibility, then matched each one to the conditions where its notes say it shines.
| Recipe | Film simulation | Best for |
| Marigold Afternoon | Classic Negative | Street and urban scenes, golden hour, overcast conditions |
| Nightfall Ember | Classic Negative | Night scenes, urban photography, mixed lighting |
| Vintage Daylight | Eterna | Golden hour, markets, events, urban scenes |
| Softened Chrome | Classic Chrome | Street, travel, daily life, golden-hour scenes |
- Marigold Afternoon

- Look: Nostalgic warmth, vibrant colours, soft shadows, and gentle highlights give it a distinctly vintage character.
- When it fails: The cool shift can work against skin tones, while studio portraits and neutral landscapes are not its strongest use cases.
- First change: Move the WB Shift closer to neutral when faces start looking too cool.
- Nightfall Ember
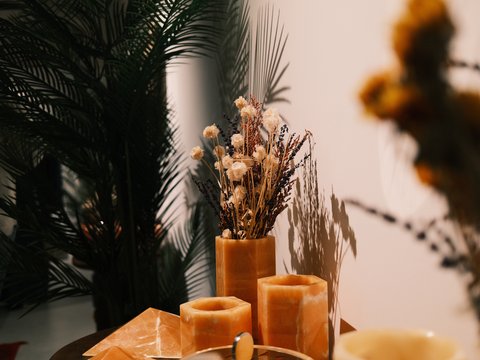
- Look: Classic Negative, strong Color Chrome effects, and the R +3 / B -5 shift create warm, moody JPEGs for mixed or night light.
- When it fails: Pure daylight can work against the recipe’s intended mood, and the red WB shift can affect skin tones.
- First change: Move the WB Shift toward neutral when warmth becomes too dominant.
- Vintage Daylight
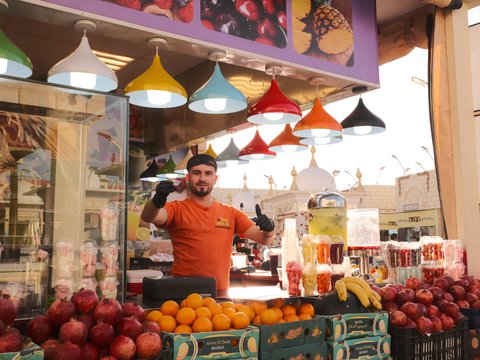
- Look: Eterna gives scenes vibrant colour, warm tones, stronger light-and-shadow separation, and a subtle film-like texture.
- When it fails: Harsh daylight can make the colours feel overwhelming and the stronger contrast can limit shadow detail.
- First change: Reduce Color when already-saturated daylight starts looking too intense.
- Softened Chrome

- Look: Classic Chrome brings warm, muted colour, large grain, enhanced reds and blues, and a softer rendering from lowered clarity.
- When it fails: Large grain can overpower fine details, and the colour shifts may not flatter controlled studio portraits.
- First change: Reduce Grain Effect when you want cleaner detail.
Portrait Recipes for Skin Tones on the X100V
For portraits, these two Astia recipes give your X100V different starting points for warm and softly lit scenes.
Use the lighting conditions as your first filter, then check your subject’s skin before settling on a recipe.
- Tungsten Clean Frame

Film Simulation: Astia
Best light: Golden hour, lively outdoor settings
Skin: Soft rendering with warm, inviting colour
Highlights: Gentle control with smooth shadow depth
Watch for: Warmth can affect cooler colours and may become too strong in some scenes
Exposure compensation: VERIFY
- Portra Sol Chrome

Film Simulation: Classic Chrome
Best light: Golden hour, warm daylight, softly lit outdoor portraits
Skin: Warm, inviting tones with restrained colour and a soft, cinematic finish.
Settings: DR400, Highlight -2, Shadow -2, Color +3, Sharpness -2, Clarity -1
WB Shift: R +2 / B -6, adding warmth while keeping the colours muted.
Watch for: The warm colour shift may not suit every complexion or mixed lighting. This recipe is better suited to outdoor portraits than controlled studio sessions.
For more help with natural skin tones, see Best Fujifilm Portrait Recipes for Natural-Looking Skin Tones.
Three Portrait Checks Before You Shoot
- Exposure compensation: VERIFY the recipe-specific value and watch the face for clipped highlights.
- White balance: Check it with a grey card when accurate colour matters.
- Skin saturation: Watch reds and overall colour intensity, especially with Color +3 in warm light.
Got your eye on the X100V? See what this little camera can do before taking it on your next photo walk.
Night and Low-Light Recipes for the X100V
After dark, the right recipe should give your JPEGs a deliberate look while keeping high-ISO noise from becoming distracting.
These two recipes take different approaches: Warm Night keeps things restrained, while Night Reversal pushes colour, contrast, and grain.
- Warm Night
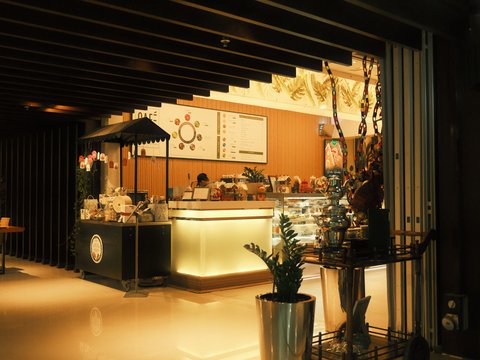
Film Simulation: Classic Negative
Best for: Warm-lit cafés, restaurants, streets, windows, and evening scenes
Core settings: DR400 · Highlight -1 · Shadow -1 · Color +1 · Sharpness 0 · Clarity -4
Noise Reduction: -4
Grain Effect: Weak · Small
White Balance: Custom Kelvin 5500K
WB Shift: R +3 / B -7
ISO: Up to ISO 6400
Exposure Compensation: 0 to +1
What to expect: Warm Night gives evening scenes a warm, nostalgic character, with softer highlights and shadows. The R +3 / B -7 shift is important here, pushing the colour noticeably toward a warmer rendering.
- Night Reversal

Film Simulation: Velvia
Best for: Colourful outdoor scenes, illuminated architecture, golden hour
Core settings: DR400 · Highlight +1 · Shadow +1 · Color +2 · Sharpness +1 · Clarity +1
Noise Reduction: -2
Grain Effect: Strong · Small
White Balance: Auto
WB Shift: R +2 / B -2
ISO: Up to ISO 6400
Exposure Compensation: +1/3 to +1
What to expect: Night Reversal pushes colour and contrast much harder than Warm Night. Its Strong Grain can make high-ISO noise read more like texture, but that same grain can overwhelm fine detail.
Quick rule: Noise Reduction does not remove noise completely; it changes how much fine detail and noise remain in the JPEG. Grain can also disguise some noise by giving it a more intentional texture.
Night colour check: Mixed street lighting can create unwanted warm or cool casts. Use the White Balance Shift tool to test R/B adjustments before saving your night setup.
Is the X100V Good for Low-Light Photography?
The Fujifilm X100V performs well in dim environments thanks to its f/2 lens, 26.1MP sensor and phase-detection autofocus with face and eye detection.
Where it works well
- Indoor scenes: Photograph cafés, restaurants and everyday moments.
- Evening street photography: Capture night scenes with careful exposure settings.
- Stationary subjects: Use slower shutter speeds when your subject remains still.
What to watch for
The X100V lacks in-body and optical image stabilization, increasing the risk of handheld blur at slower shutter speeds. Balance aperture, shutter speed and ISO according to the available light.
X100V vs X100VI: The newer X100VI adds in-body image stabilization, making it better suited to handheld shooting at slower shutter speeds.
How to Tune a Recipe With White Balance Shift and Tone Curves?
A few small WB Shift or tone-curve changes can bring a recipe closer to the light, subject, and contrast you actually see while shooting.
Start with one adjustment at a time, and check the JPEG before changing another value or rebuilding the whole recipe.
| Symptom | Adjustment to try |
| Too warm | Move Red toward a lower value and Blue toward a higher value to cool the colour. Specific numbers: VERIFY. |
| Too green | Adjust Red and Blue toward the opposite colour cast, making small changes until the green tint recedes. Exact direction/value: VERIFY. |
| Too contrasty | Move Highlight lower and Shadow lower to soften the contrast. Specific values: VERIFY. |
| Too flat | Move Highlight higher and Shadow higher to add contrast. Specific values: VERIFY. |
White Balance Shift: Fujipic states that the shift adjusts in 1/20 steps. The visualizer displays an R/B range of -9 to +9 on each axis (VERIFY), so use the camera’s displayed values when applying a recipe.
If a recipe still looks too warm or green, the White Balance Shift guide explains how the R and B grid moves your colors.
For a visual check before saving your new values, try the White Balance Shift tool and compare the change across skin, sky, and foliage.
Common X100V Recipe Mistakes and How to Fix Them
A recipe can look disappointing even when you entered every setting correctly, because shooting conditions and camera settings still matter.
Before changing the recipe itself, run through these five checks; each one can change how the finished JPEG looks.
- Expecting the Recipe to Change RAW Files
What happened: The recipe only changes the JPEG produced by the camera. Your RAW file remains untouched, so it will not suddenly carry the recipe’s colour, grain, or tone settings.
Fix: Use the recipe for JPEG output, and treat the RAW file as your unprocessed original.
- Using a Recipe for the Wrong Sensor
What happened: A recipe created for another sensor generation may not render the same way on your X100V.
Fix: Check the recipe’s sensor tag before loading it. For supported conversions, use the Recipe Converter instead of copying settings blindly.
- Ignoring Exposure Compensation
What happened: A recipe can look noticeably different when the exposure changes, even though every other setting matches.
Fix: Check the recipe’s Exposure Compensation recommendation. Any specific value should be treated as VERIFY, then test one frame before continuing.
- Setting Auto ISO Too High
What happened: A high Auto ISO ceiling can push the camera into higher ISO values than the recipe was intended for, making noise more visible.
Fix: Check the recipe’s stated ISO range and adjust your Auto ISO ceiling to suit the look you want.
- Cropping a Grainy JPEG Too Much
What happened: Grain is already part of the JPEG. Once you crop and enlarge that file, fine grain patterns become larger and can look coarse.
Fix: Avoid heavy crops when using stronger grain recipes. Getting closer in camera preserves the intended texture.
End Notes
The X100V has a lot going for it: a sharp 35mm-equivalent lens, lovely in-camera colour options, and controls that make photography feel hands-on. Its fixed lens isn’t for everyone, but if you enjoy street photography, travel, and everyday moments, it’s a camera worth considering.
Thinking about the X100V? Take a closer look at the camera on FujiPic, explore its specs and features, and find a few film recipes to try on your next photo walk.
FAQs
- Which X100V recipe should I use for everyday photography?
For everyday shooting, start with a recipe whose lighting recommendations match how you normally photograph, rather than chasing one universal look. Marigold Afternoon is a practical starting point for urban scenes, golden hour, and overcast conditions, while Vintage Daylight suits warmer, more cinematic scenes.
- Which X100V recipe is best for portraits?
For portraits, Tungsten Clean Frame and Astia Reverie are useful starting points because both use Astia and are listed for the X100V. Tungsten Clean Frame suits warm outdoor light, while Astia Reverie is aimed more toward natural settings and softer, even lighting, so test either on your actual subject first.
- Which X100V recipe should I use for night photography?
For warm evening scenes, Warm Night is the more direct starting point, using Classic Negative, DR400, and a strong R +3 / B -7 shift. Its recipe also specifies ISO up to 6400, Weak Grain, and Noise Reduction -4, giving the JPEG a warm, textured night rendering rather than removing high-ISO noise.
- How do I know if a recipe is compatible with my X100V?
Look for an X-Trans IV sensor tag or a recipe whose tested-camera list specifically includes the X100V. The X100V uses X-Trans IV, and FujiPic’s recipe library lets you filter recipes by camera or sensor generation before copying the settings.
- How many recipes can I save on the X100V?
The X100V can save up to seven Custom Setting banks, named CUSTOM 1 through CUSTOM 7. That gives you room to keep separate setups for situations such as everyday shooting, portraits, night scenes, and other conditions without rebuilding the settings each time.
- Why does my X100V recipe look different from the sample photos?
A recipe is a starting setup, not a guarantee that every scene will render identically to the sample, because exposure, light colour, subject colours, and shooting conditions change the JPEG. The same settings can therefore look warmer, flatter, darker, or more saturated depending on what you photograph.
- What should I change if an X100V recipe looks too warm or green?
Start with White Balance and WB Shift before changing several recipe settings at once, because R/B adjustments directly alter the colour balance of the JPEG. Make small changes while checking a test frame, particularly when shooting under mixed lighting where different light sources can push skin and neutral surfaces off colour.
- What ISO and Exposure Compensation should I use with an X100V recipe?
Use the ISO and Exposure Compensation guidance supplied with the specific recipe, then adjust for the scene rather than treating those values as fixed camera rules. For example, FujiPic recipes can specify ISO ceilings and exposure ranges, so check the individual recipe before shooting instead of applying one setting across every recipe.