Fujifilm Straight Out of Camera: Why It Looks So Good
Fujifilm straight out of camera JPEGs look great with X-Trans color, Film Simulations, and custom settings.
If you’re tired of spending hours pixel peeping behind a laptop, you’re going to love how Fujifilm handles colors. While other camera brands give you flat, neutral files that beg for an edit, Fujifilm bakes rich character and film-like contrast directly into the photo as you shoot.
It honestly feels like cheating. If you want to master the Fujifilm straight out of camera approach, here is how the JPEG engine works and how to set it up for success. We’ll look at what happens between the sensor and finished JPEG, then show you how to build the look yourself using practical settings and recipes.
First, let’s see what “straight out of camera” actually means on Fujifilm.
What Does “Straight Out of Camera” Actually Mean on a Fujifilm?
A Fujifilm SOOC JPEG is a camera-processed image that already looks finished without needing another edit.
In other words, you make the creative choices in-camera, press the shutter, and get a JPEG you can actually use.
| File type | What you get |
| SOOC JPEG | A finished JPEG processed by the camera using your chosen settings |
| RAW | Mostly unprocessed sensor data designed for editing later |
| Lightroom-edited JPEG | A camera JPEG that has been adjusted further in Lightroom |
| RAW + JPEG | A ready-to-use JPEG plus the original RAW file |
- The fun part of shooting straight out of camera is that your editing decisions happen before you leave the scene.
- Fujifilm’s Film Simulation, white balance, tone, color, and grain settings all help shape that final JPEG.
- Your X-Trans sensor plays a role too, but the camera’s processing is what really brings everything together.
For more Fujifilm portrait ideas, check out Best Fujifilm Portrait Recipes for Natural-Looking Skin Tones to find recipes that keep skin tones natural while adding character.
So why do Fujifilm JPEGs have that distinctive color and character straight from the camera?
The Real Reason Fujifilm SOOC Colors Look So Good
Fujifilm’s SOOC look comes from two factors working together: X-Trans sensor design and decades of analog film expertise.
The sensor affects how color information is captured, while Fujifilm’s film science shapes how that information gets rendered.
Here is how each one contributes.
The X-Trans Sensor Is Part of the Answer
- The basic idea: X-Trans uses a 6×6 color filter array instead of the conventional Bayer pattern found on most cameras.
- Why that matters: The less repetitive arrangement helps reduce moiré and false color, allowing Fujifilm to avoid an optical low-pass filter.
- The film connection: Fujifilm designed the irregular pattern to resemble the unpredictable structure of photographic film grain.
- A useful fact: Fujifilm introduced its first X-Trans CMOS sensor in 2012 with the X-Pro1.
The sensor can help preserve fine detail and provide clean color information, but it is only part of the SOOC equation.
Fujifilm’s Film Heritage Is the Bigger Part
- The bigger advantage: Fujifilm has more than 80 years of experience developing photographic film and understanding how color behaves.
- Where that shows up: Film Simulations such as Provia, Velvia, and Astia are digital interpretations of real Fujifilm films.
- Why photographers notice it: Those films were designed around specific color, contrast, and tonal responses rather than generic digital processing.
- A useful fact: Fujifilm’s first photographic film, Fujicolor, dates back to 1934, giving the company decades of color-film experience before digital cameras arrived.
That accumulated knowledge is a major reason Fujifilm colors feel intentionally crafted rather than simply processed for maximum punch.
Film Simulations: Fujifilm’s Built-In Color Recipes
A Film Simulation is Fujifilm’s built-in color and tone profile that gives JPEGs a specific photographic character. Think of it as choosing the starting look for your image before you press the shutter.
Here are the film simulations most responsible for Fujifilm’s SOOC reputation, and what each one is built for:
| Film Simulation | Look | Best For |
| Provia | Balanced color, moderate contrast, and natural-looking tones | Everyday shooting, travel, and scenes where accurate color matters |
| Velvia | High saturation, strong contrast, and vivid color separation | Landscapes, nature, and colorful scenes |
| Classic Chrome | Muted color, restrained saturation, and documentary-style rendering | Street photography, travel, and photojournalism |
| Acros | Rich monochrome tones with strong separation and distinctive grain character | Street, portraits, architecture, and documentary work |
| Nostalgic Negative | Warm highlights, soft contrast, and amber-leaning color | Portraits, lifestyle, and nostalgic everyday photography |
| Reala Ace | Natural color, balanced contrast, and gentle tonal rendering | Portraits, weddings, lifestyle, and everyday photography |
- The important bit: A film simulation gives you the base look, but it is not the whole recipe.
- What photographers add: White balance, Highlight Tone, Shadow Tone, Color, Sharpness, Noise Reduction, and Grain can all change the final JPEG.
- Why recipes matter: Combining those settings with a film simulation creates the custom combinations photographers call recipes.
A Film Simulation Is Only the Starting Point
A Film Simulation gives you the foundation, but a recipe takes that starting look and tunes it for a particular shooting mood.
Here are two FujiPic recipes that show the difference:
- Marigold Afternoon
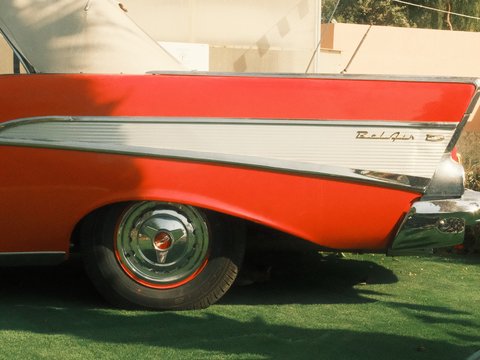
- Film Simulation: Classic Negative
- Compatible with: X-E4, X-Pro3, X-S10
- Why try it: A good option when you want more personality and a nostalgic feel from everyday photographs.
- Useful for: Travel, daily life, and scenes where you want your JPEGs to feel less standard.
- Expired Reala Warmth

- Film Simulation: Reala Ace
- Compatible with: X-E5, X-H2, X-H2S
- Why try it: A warmer recipe that works nicely when you want a softer, more nostalgic interpretation of everyday scenes.
- Useful for: Portraits, lifestyle photographs, and relaxed shooting where warmth matters.
The point is simple: the film simulation sets the direction, while the recipe gives you a more specific destination. You can browse film simulation recipes and find combinations that suit your camera and the way you like to shoot.
That recipe approach is what turns a good built-in look into a repeatable SOOC style you can actually shoot with.
What Happens Inside the Camera the Moment You Press the Shutter?
When you press the shutter, Fujifilm captures the scene, applies your settings, and turns that information into a finished JPEG.
Here is the actual sequence, broken into the stages that shape the final JPEG:
- Light hits the X-Trans sensor
- Light reaches the sensor and gets recorded as raw sensor data.
- This data contains the brightness and color information needed to create the image.
- The X-Processor creates the base look
- The X-Processor takes that sensor data and applies your selected Film Simulation.
- This gives the JPEG its starting color, contrast, and overall character.
- Dynamic Range protects bright areas
- Dynamic Range settings include DR100, DR200, and DR400.
- Higher settings can preserve more highlight detail by adjusting how the camera handles exposure.
- Your Custom Setting fine-tunes the image
- Highlight and Shadow settings shape how bright and dark areas are rendered.
- Color and Sharpness adjust saturation and perceived detail to match your chosen Custom Setting.
- The finishing touches are added
- Grain Effect adds texture that can give the JPEG a more film-like appearance.
- Color Chrome and Color Chrome FX Blue add depth and separation before the JPEG is compressed and saved.
The entire sequence happens in a fraction of a second, while the original RAW data underneath remains untouched.
You can learn how every setting works before combining them into your own repeatable Fujifilm recipe.
Why Do Fujifilm JPEGs Look Different From Other Brands?
The difference comes down to philosophy: most brands chase accurate color, while Fujifilm deliberately builds a film-inspired aesthetic into its JPEGs.
Here’s the easiest way to see what each brand is trying to achieve:
| Brand | JPEG Engine Priority | Typical SOOC Result |
| Fujifilm | Film-inspired color, distinctive tonality, and creative control | JPEGs with noticeable character, contrast, and color personality |
| Canon | Natural color, pleasing skin tones, and balanced rendering | Clean JPEGs with natural color and attractive skin tones |
| Nikon | Natural color, tonal detail, and flexible rendering | Balanced JPEGs with realistic color and strong detail |
| Sony | Color accuracy, detail, and broad processing flexibility | Clean, detailed JPEGs with relatively restrained color rendering |
So, why does Fuji feel different?
If you’ve shot more than one camera brand, you’ve probably noticed this pretty quickly: the same scene can come out looking surprisingly different.
With Fujifilm, the JPEG is part of the creative process
- You choose a Film Simulation before shooting.
- You adjust white balance, highlights, shadows, color, and grain.
- The camera then builds those choices into the finished JPEG.
Other brands give you plenty of control too, but their default rendering often starts from a more natural or accuracy-focused position.
So this isn’t really about one brand making “better” JPEGs. It is about what you want the camera to give you before you ever open an editing app.
How to Get Fujifilm’s Best SOOC Colors on Your Own Camera?
The easiest way to get great SOOC color is to start with a compatible recipe, save it correctly, then test it.
Here is the exact path, from picking a starting point to saving it permanently to your camera:
- Check your sensor generation
First: Find your exact Fujifilm camera model and sensor generation before choosing any recipe.
Why: Different generations support different Film Simulations and Custom Setting parameters, so compatibility matters from the start.
- Start with a tested recipe
First: Choose a recipe already tested for your camera and the type of photographs you normally shoot.
Why: A proven starting point gives you predictable results instead of hours spent randomly changing individual settings.
- Save it to a Custom Setting
First: Enter each recipe setting through the Q button or Image Quality Setting menu on your camera.
Then: Save the completed combination into a Custom Setting slot such as C1 through C7 for quick access.
- Test it in real conditions
First: Shoot people, buildings, greenery, skies, and indoor scenes across different lighting conditions.
Then: Review the JPEGs on your phone or computer and adjust anything that consistently looks wrong.
Skip the trial-and-error phase
You can browse tested Fujifilm recipes instead of building everything from scratch, then check your camera’s recipe compatibility before saving one.
Once you find a combination that fits your camera and shooting style, your straight out of camera workflow becomes much easier to repeat.
Common Reasons Your Fujifilm Photos Don’t Look This Good Yet
The most common cause is shooting factory-default settings designed for accuracy rather than a distinctive Fujifilm character.
These are the four issues that explain most disappointing Fujifilm JPEGs:
- Default settings: If you’ve never touched your Custom Settings, you’re mostly seeing Fujifilm’s standard processing.
- That’s perfectly usable, but it isn’t designed to give you a personalized recipe look.
- Wrong Film Simulation for the scene: Provia can look fairly restrained when you’re shooting in flat, low-contrast light.
- Try a simulation whose contrast and color response better suit the scene you’re photographing.
- Ignoring white balance shift: Many recipes depend on an R/B shift to create their specific color cast, so leaving White Balance untouched can change the entire look.
- The White Balance Shift Visualizer makes those shifts easier to understand before you save them.
- Exposure habits: A recipe may have been designed around a particular exposure compensation, so shooting everything at your usual exposure can change its intended contrast.
- Check the recipe’s recommended exposure compensation before deciding the settings are not working.
If you want more control over your JPEG look, learn How to Build a Custom Fujifilm Recipe From Scratch and create a recipe around your own shooting style.
Every one of these is fixable in minutes through your existing camera settings, without buying new gear.
Best Fujifilm Cameras for Straight-Out-of-Camera Shooting
Any Fujifilm X or GFX body from roughly 2018 onward can produce strong SOOC results, especially X-Trans IV or newer.
Here is how the main sensor generations compare for this specific purpose:
| Sensor Generation | Example Cameras | SOOC Strength |
| X-Trans III | X-T2, X-Pro2, X100F | Great JPEG color and plenty of recipe potential |
| X-Trans IV | X-T3, X-T4, X100V | More Film Simulations and strong recipe flexibility |
| X-Trans V | X-T5, X100VI, X-E5 | Broad Film Simulation support and extensive recipe options |
| GFX | GFX 50S II, GFX 100S, GFX100 II | Large-format files with Fujifilm’s Film Simulations and color controls |
You absolutely do not need the newest body for great JPEGs, and older models remain excellent options for photographers on tighter budgets.
If you’re comparing compatibility, you can browse cameras by sensor and see which recipes and Film Simulations work with your body.
End Notes
Fujifilm’s SOOC look comes from its sensor design, film heritage, and JPEG engine built to deliver character rather than pure accuracy.
Pick one recipe that works with your camera, save it to C1, and shoot with it consistently for one week. Pay attention to people, skies, shadows, and changing light, because that will quickly show you where the recipe works best.
FujiPic is built by photographers, not a commercial preset shop, and why we built FujiPic gives you the story behind it.
Ready to find your starting point? Browse the full recipe library and use the free Fujifilm tools to build a setup you’ll actually enjoy shooting with.
Frequently Asked Questions
- Do Fujifilm photos need editing?
Fujifilm photos do not need editing when your Film Simulation and Custom Setting already produce the JPEG look you want.
- What makes Fujifilm JPEGs look better than other brands?
Fujifilm JPEGs combine Film Simulations, detailed Custom Settings, and film-derived color processing for deliberately characterful in-camera rendering.
- What does SOOC mean in photography?
SOOC means “Straight Out Of Camera,” describing a photo used directly from the camera without additional editing.
- Which Fujifilm Film Simulation gives the best straight-out-of-camera look?
There is no single best Film Simulation, because Provia, Classic Chrome, Velvia, and others suit different subjects and lighting.
- Can I get this SOOC look on an older Fujifilm camera?
Older Fujifilm cameras can produce excellent SOOC images, although available Film Simulations and recipe settings depend upon their sensor generation.
- Do Fujifilm Film Simulations change the RAW file too?
Fujifilm Film Simulations primarily affect the JPEG rendering, while the underlying RAW file retains sensor data for later processing.
- Why do my Fujifilm photos look flat compared to photos I see online?
Flat JPEGs often result from default settings, unsuitable Film Simulations, missed white-balance shifts, or incorrect recipe exposure.
- What is the difference between a Fujifilm Film Simulation and a recipe?
A Film Simulation provides the base rendering, while a recipe combines it with white balance and additional Custom Setting adjustments.